
[fusion_builder_container hundred_percent=”no” equal_height_columns=”no” menu_anchor=”” hide_on_mobile=”small-visibility,medium-visibility,large-visibility” class=”” id=”” background_color=”” background_image=”” background_position=”center center” background_repeat=”no-repeat” fade=”no” background_parallax=”none” enable_mobile=”no” parallax_speed=”0.3″ video_mp4=”” video_webm=”” video_ogv=”” video_url=”” video_aspect_ratio=”16:9″ video_loop=”yes” video_mute=”yes” video_preview_image=”” border_size=”” border_color=”” border_style=”solid” margin_top=”” margin_bottom=”” padding_top=”” padding_right=”” padding_bottom=”” padding_left=”” admin_label=”Intro”][fusion_builder_row][fusion_builder_column type=”1_1″ layout=”1_1″ spacing=”” center_content=”no” hover_type=”none” link=”” min_height=”” hide_on_mobile=”small-visibility,medium-visibility,large-visibility” class=”” id=”” background_color=”” background_image=”” background_position=”left top” background_repeat=”no-repeat” border_size=”0″ border_color=”” border_style=”solid” border_position=”all” padding=”” dimension_margin=”” animation_type=”” animation_direction=”left” animation_speed=”0.3″ animation_offset=”” last=”no”][fusion_text]
Here is my warning to you, YOU MUST MAKE BACKUPS! Did I say it loud enough? Probably, and since you’re here trying to learn about BackWPup, I can fell confident that you heard me.
BackWPup is an awesome plugin you can use that will give you lots of power when backing up your WordPress files and database.
Watch the Video Tutorial here or follow the tutorial below.
I will be using the FREE versions of everything today so let’s start at the beginning. The FREE version of BackWPup supports backing up to these sources:
- Store backup to directory
- Store backup to FTP server (needs ftp)
- Store backup to Dropbox (needs curl)
- Store backup to S3 services (needs PHP 5.3.3, needs curl)
- Store backup to Microsoft Azure (Blob) (needs PHP 5.3.2, curl)
- Store backup to RackSpaceCloud (needs PHP 5.3.2, curl)
- Store backup to SugarSync (needs curl)
We will be using Dropbox for our cloud storage and EasyCron to automate our backups through a daily schedule or [fusion_tooltip title=”The software utility Cron is a time-based job scheduler in Unix-like computer operating systems. ” class=”” id=”” placement=”top” trigger=”hover”]cron job[/fusion_tooltip]. Remember, there are tons of features for each so after you set up and run your first backup successfully, take some time and look around. Don’t worry if you break something, you have a backup!!!
How exactly do I follow a sentence I ended with 3 exclamation marks?
[/fusion_text][fusion_alert type=”success” accent_color=”” background_color=”” border_size=”” icon=”” box_shadow=”” hide_on_mobile=”small-visibility,medium-visibility,large-visibility” class=”” id=”” animation_type=”” animation_direction=”left” animation_speed=”0.3″ animation_offset=””]
Tutorial is Starting Now
[/fusion_alert][fusion_text]
Sign Up
You will need to create accounts for both [fusion_tooltip title=”Dropbox offers a Free 2GB Cloud Storage plan.” class=”” id=”” placement=”top” trigger=”hover”]Dropbox[/fusion_tooltip] and [fusion_tooltip title=”EasyCron offers a FREE plan that gives you 200EPD’s a day, should be enough for you.” class=”” id=”” placement=”top” trigger=”hover”]EasyCron[/fusion_tooltip]. After you have signed up, make sure you log in to each account and keep the tab opened. When we do some set up in BackWPup, it will make things go faster.
[/fusion_text][/fusion_builder_column][/fusion_builder_row][/fusion_builder_container][fusion_builder_container admin_label=”Sign Up for” hundred_percent=”no” equal_height_columns=”yes” menu_anchor=”” hide_on_mobile=”small-visibility,medium-visibility,large-visibility” class=”” id=”” background_color=”” background_image=”” background_position=”center center” background_repeat=”no-repeat” fade=”no” background_parallax=”none” enable_mobile=”no” parallax_speed=”0.3″ video_mp4=”” video_webm=”” video_ogv=”” video_url=”” video_aspect_ratio=”16:9″ video_loop=”yes” video_mute=”yes” video_preview_image=”” border_size=”” border_color=”” border_style=”solid” margin_top=”” margin_bottom=”” padding_top=”” padding_right=”” padding_bottom=”” padding_left=””][fusion_builder_row][fusion_builder_column type=”1_2″ layout=”1_3″ spacing=”0″ center_content=”yes” hover_type=”none” link=”” min_height=”” hide_on_mobile=”small-visibility,medium-visibility,large-visibility” class=”” id=”” background_color=”rgba(93,180,174,0.5)” background_image=”” background_position=”left top” undefined=”” background_repeat=”no-repeat” border_size=”0″ border_color=”” border_style=”solid” border_position=”all” padding=”40 40 40 40″ margin_top=”” margin_bottom=”” animation_type=”” animation_direction=”left” animation_speed=”0.3″ animation_offset=”” last=”no”][fusion_imageframe image_id=”13194″ style_type=”none” stylecolor=”” hover_type=”none” bordersize=”” bordercolor=”” borderradius=”” align=”center” lightbox=”no” gallery_id=”” lightbox_image=”” alt=”” link=”” linktarget=”_self” hide_on_mobile=”small-visibility,medium-visibility,large-visibility” class=”” id=”” animation_type=”bounce” animation_direction=”static” animation_speed=”0.5″ animation_offset=””]http://wedointernet.net/wp-content/uploads/2017/10/dropbox-01.png[/fusion_imageframe][fusion_separator style_type=”none” hide_on_mobile=”small-visibility,medium-visibility,large-visibility” class=”” id=”” sep_color=”” top_margin=”15″ bottom_margin=”15″ border_size=”” icon=”” icon_circle=”” icon_circle_color=”” width=”” alignment=”center” /][fusion_text]
Sign up for Dropbox
Use this referral link and I will get free storage, you will get free storage, it’s a win-win.
[/fusion_text][/fusion_builder_column][fusion_builder_column type=”1_2″ layout=”1_3″ spacing=”0″ center_content=”no” hover_type=”none” link=”” min_height=”” hide_on_mobile=”small-visibility,medium-visibility,large-visibility” class=”” id=”” background_color=”rgba(34,145,200,0.5)” background_image=”” background_position=”left top” undefined=”” background_repeat=”no-repeat” border_size=”0″ border_color=”” border_style=”solid” border_position=”all” padding=”40 40 40 40″ margin_top=”” margin_bottom=”” animation_type=”” animation_direction=”left” animation_speed=”0.3″ animation_offset=”” last=”no”][fusion_imageframe image_id=”13195″ style_type=”none” stylecolor=”” hover_type=”none” bordersize=”” bordercolor=”” borderradius=”” align=”center” lightbox=”no” gallery_id=”” lightbox_image=”” alt=”” link=”” linktarget=”_self” hide_on_mobile=”small-visibility,medium-visibility,large-visibility” class=”” id=”” animation_type=”bounce” animation_direction=”static” animation_speed=”0.3″ animation_offset=””]http://wedointernet.net/wp-content/uploads/2017/10/easycron-logo-01.png[/fusion_imageframe][fusion_separator style_type=”none” hide_on_mobile=”small-visibility,medium-visibility,large-visibility” class=”” id=”” sep_color=”” top_margin=”15″ bottom_margin=”15″ border_size=”” icon=”” icon_circle=”” icon_circle_color=”” width=”” alignment=”center” /][fusion_text]
Sign up for EasyCron
Make sure you choose the FREE plan.
[/fusion_text][/fusion_builder_column][/fusion_builder_row][/fusion_builder_container][fusion_builder_container hundred_percent=”no” equal_height_columns=”no” menu_anchor=”” hide_on_mobile=”small-visibility,medium-visibility,large-visibility” class=”” id=”” background_color=”” background_image=”” background_position=”center center” background_repeat=”no-repeat” fade=”no” background_parallax=”none” enable_mobile=”no” parallax_speed=”0.3″ video_mp4=”” video_webm=”” video_ogv=”” video_url=”” video_aspect_ratio=”16:9″ video_loop=”yes” video_mute=”yes” video_preview_image=”” border_size=”” border_color=”” border_style=”solid” margin_top=”” margin_bottom=”” padding_top=”” padding_right=”” padding_bottom=”” padding_left=”” admin_label=”Install BackWPup”][fusion_builder_row][fusion_builder_column type=”1_1″ layout=”1_1″ spacing=”” center_content=”no” hover_type=”none” link=”” min_height=”” hide_on_mobile=”small-visibility,medium-visibility,large-visibility” class=”” id=”” background_color=”” background_image=”” background_position=”left top” background_repeat=”no-repeat” border_size=”0″ border_color=”” border_style=”solid” border_position=”all” padding=”” dimension_margin=”” animation_type=”” animation_direction=”left” animation_speed=”0.3″ animation_offset=”” last=”no”][fusion_text]
Install BackWPup
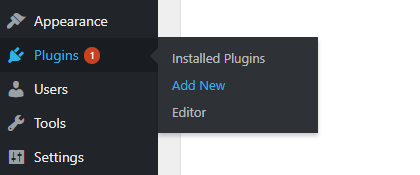
Log into your WordPress dashboard.

Hover over the left Menu “Plugins” and then select Add New.
Type in BackWPup in the Search box on the right and WordPress will find it for you.
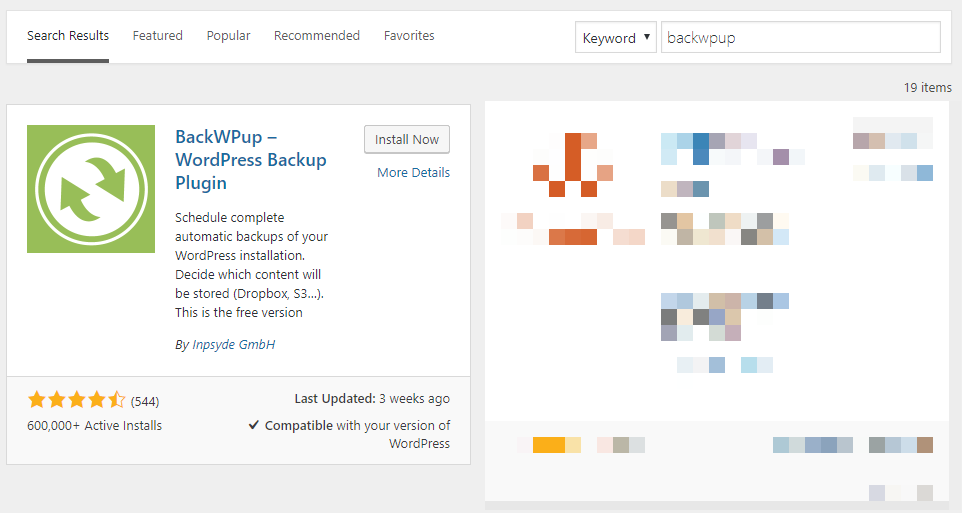
Click on the Install button.
Click on the Activate button.
You are now ready to start setting up BackWPup with Dropbox and EasyCron.
[/fusion_text][/fusion_builder_column][/fusion_builder_row][/fusion_builder_container][fusion_builder_container hundred_percent=”no” equal_height_columns=”no” menu_anchor=”” hide_on_mobile=”small-visibility,medium-visibility,large-visibility” class=”” id=”” background_color=”” background_image=”” background_position=”center center” background_repeat=”no-repeat” fade=”no” background_parallax=”none” enable_mobile=”no” parallax_speed=”0.3″ video_mp4=”” video_webm=”” video_ogv=”” video_url=”” video_aspect_ratio=”16:9″ video_loop=”yes” video_mute=”yes” video_preview_image=”” border_size=”” border_color=”” border_style=”solid” margin_top=”” margin_bottom=”” padding_top=”” padding_right=”” padding_bottom=”” padding_left=”” admin_label=”Initial Set Up BackWPup”][fusion_builder_row][fusion_builder_column type=”1_1″ layout=”1_1″ spacing=”” center_content=”no” hover_type=”none” link=”” min_height=”” hide_on_mobile=”small-visibility,medium-visibility,large-visibility” class=”” id=”” background_color=”” background_image=”” background_position=”left top” background_repeat=”no-repeat” border_size=”0″ border_color=”” border_style=”solid” border_position=”all” padding=”” dimension_margin=”” animation_type=”” animation_direction=”left” animation_speed=”0.3″ animation_offset=”” last=”no”][fusion_text]
Add New Job
Now we are going to start choosing the options for BackWPup. Afterward we will start integrating Dropbox and EasyCron (to leave the defaults, click here to skip to integration).
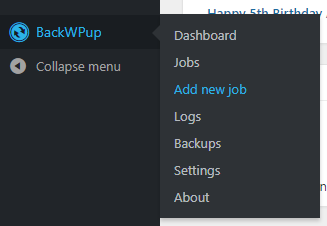
On the left dashboard menu, hover over the BackWPup menu near the bottom and click on Add New Job.
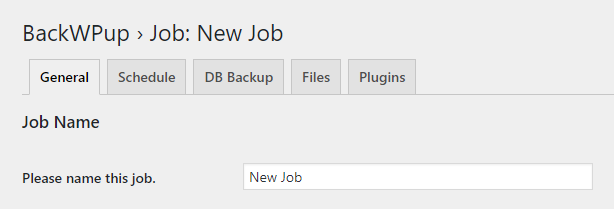
Now you are at BackWPup New Job Settings, give your job a creative name like: Backup 01
[/fusion_text][fusion_text]
Job Tasks
Under Job Tasks you can leave the default settings as they are necessary to make a working backup copy. Advance users can select/de-select as needed.

[/fusion_text][/fusion_builder_column][/fusion_builder_row][/fusion_builder_container][fusion_builder_container hundred_percent=”no” equal_height_columns=”no” menu_anchor=”” hide_on_mobile=”small-visibility,medium-visibility,large-visibility” class=”” id=”” background_color=”” background_image=”” background_position=”center center” background_repeat=”no-repeat” fade=”no” background_parallax=”none” enable_mobile=”no” parallax_speed=”0.3″ video_mp4=”” video_webm=”” video_ogv=”” video_url=”” video_aspect_ratio=”16:9″ video_loop=”yes” video_mute=”yes” video_preview_image=”” border_size=”” border_color=”” border_style=”solid” margin_top=”” margin_bottom=”” padding_top=”” padding_right=”” padding_bottom=”” padding_left=””][fusion_builder_row][fusion_builder_column type=”1_1″ layout=”1_1″ spacing=”” center_content=”no” hover_type=”none” link=”” min_height=”” hide_on_mobile=”small-visibility,medium-visibility,large-visibility” class=”” id=”” background_color=”” background_image=”” background_position=”left top” background_repeat=”no-repeat” border_size=”0″ border_color=”” border_style=”solid” border_position=”all” padding=”” dimension_margin=”” animation_type=”” animation_direction=”left” animation_speed=”0.3″ animation_offset=”” last=”no”][fusion_text]
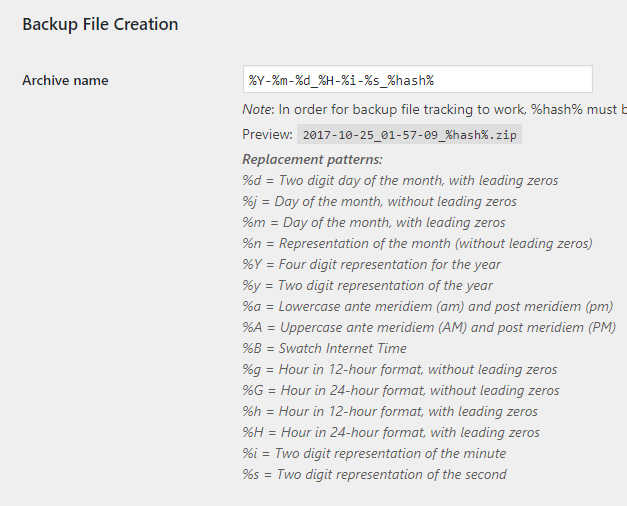
Backup File Creation
Under Backup File Creation, add a name for your file before the %Y in the input field. Underneath are more examples of helpful replacement patterns you can use. If you add a new one or delete one that’s there, the Preview area will update showing you what your file name will look like.
This is super helpful to keep you organized and know when backups were made. [fusion_tooltip title=”It is a good practice to put the Year, then Month and then Day when naming your files. This will make sure that your files are sorted correctly.” class=”” id=”” placement=”top” trigger=”hover”]Hover for a Tip[/fusion_tooltip]
[/fusion_text][/fusion_builder_column][/fusion_builder_row][/fusion_builder_container][fusion_builder_container hundred_percent=”no” equal_height_columns=”no” menu_anchor=”” hide_on_mobile=”small-visibility,medium-visibility,large-visibility” class=”” id=”” background_color=”” background_image=”” background_position=”center center” background_repeat=”no-repeat” fade=”no” background_parallax=”none” enable_mobile=”no” parallax_speed=”0.3″ video_mp4=”” video_webm=”” video_ogv=”” video_url=”” video_aspect_ratio=”16:9″ video_loop=”yes” video_mute=”yes” video_preview_image=”” border_size=”” border_color=”” border_style=”solid” margin_top=”” margin_bottom=”” padding_top=”” padding_right=”” padding_bottom=”” padding_left=””][fusion_builder_row][fusion_builder_column type=”1_1″ layout=”1_1″ spacing=”” center_content=”no” hover_type=”none” link=”” min_height=”” hide_on_mobile=”small-visibility,medium-visibility,large-visibility” class=”” id=”” background_color=”” background_image=”” background_position=”left top” background_repeat=”no-repeat” border_size=”0″ border_color=”” border_style=”solid” border_position=”all” padding=”” dimension_margin=”” animation_type=”” animation_direction=”left” animation_speed=”0.3″ animation_offset=”” last=”no”][fusion_menu_anchor name=”skip-dropbox” class=”” /][fusion_text]
Archive Format
Under Archive Type, choose the file format for your backup, I like to choose zip, but tar can work well if I’m using SSH.

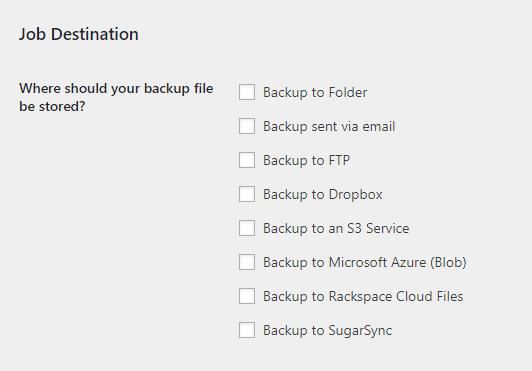
Job Destination
Under Job Destination, you can choose any or all, but for this tutorial, choose Dropbox.
[fusion_alert type=”error” accent_color=”” background_color=”” border_size=”” icon=”” box_shadow=”” hide_on_mobile=”small-visibility,medium-visibility,large-visibility” class=”” id=”” animation_type=”” animation_direction=”left” animation_speed=”0.3″ animation_offset=””]
Be Aware, storing Zip archives or other executables on your server may allow hackers to gain access to your files. If you must backup to a folder on your server, download it and then delete it from your server. Stay safe, my friends.
[/fusion_alert]
[/fusion_text][fusion_text]
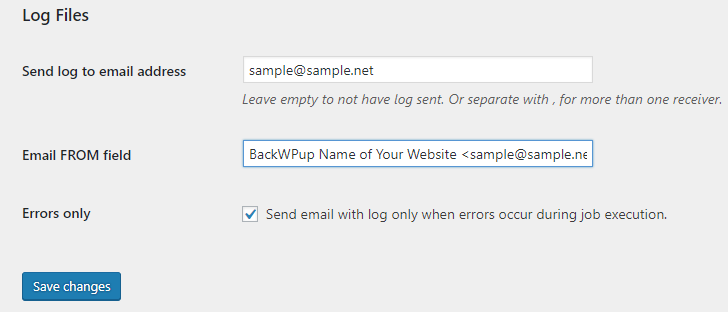
Log Files
Lastly, for completing your BackWPup initial set up, put in the email address for you to receive log information and leave the checkbox checked for Send email with log only when errors occur during job execution.
This is helpful to figure out what went wrong.
Here is a sample error file. It helped me to see that something was wrong with the Dropbox API, Turns out that the version of BackWPup that I had was using an outdated API call. I updated BackWPup and I was back in action. Super helpful, goes to my email, highlights the error.

Save your changes and you are ready to go and set up Dropbox.
[/fusion_text][/fusion_builder_column][/fusion_builder_row][/fusion_builder_container][fusion_builder_container hundred_percent=”no” equal_height_columns=”no” menu_anchor=”” hide_on_mobile=”small-visibility,medium-visibility,large-visibility” class=”” id=”” background_color=”” background_image=”” background_position=”center center” background_repeat=”no-repeat” fade=”no” background_parallax=”none” enable_mobile=”no” parallax_speed=”0.3″ video_mp4=”” video_webm=”” video_ogv=”” video_url=”” video_aspect_ratio=”16:9″ video_loop=”yes” video_mute=”yes” video_preview_image=”” border_size=”” border_color=”” border_style=”solid” margin_top=”” margin_bottom=”” padding_top=”” padding_right=”” padding_bottom=”” padding_left=””][fusion_builder_row][fusion_builder_column type=”1_1″ layout=”1_1″ spacing=”” center_content=”no” hover_type=”none” link=”” min_height=”” hide_on_mobile=”small-visibility,medium-visibility,large-visibility” class=”” id=”” background_color=”” background_image=”” background_position=”left top” background_repeat=”no-repeat” border_size=”0″ border_color=”” border_style=”solid” border_position=”all” padding=”” dimension_margin=”” animation_type=”” animation_direction=”left” animation_speed=”0.3″ animation_offset=”” last=”no”][fusion_text]
Setting up Dropbox’s API with BackWPup
[/fusion_text][fusion_text]
Now that you are all set-up, it’s time to connect Dropbox to BackWPup.
What you probably didn’t notice, when you clicked on the Backup to Dropbox checkbox, a new tab was added at the top.

Of course, if you check off more places to store your files, you will add tabs for each.
[/fusion_text][/fusion_builder_column][/fusion_builder_row][/fusion_builder_container][fusion_builder_container hundred_percent=”no” equal_height_columns=”no” menu_anchor=”” hide_on_mobile=”small-visibility,medium-visibility,large-visibility” class=”” id=”” background_color=”” background_image=”” background_position=”center center” background_repeat=”no-repeat” fade=”no” background_parallax=”none” enable_mobile=”no” parallax_speed=”0.3″ video_mp4=”” video_webm=”” video_ogv=”” video_url=”” video_aspect_ratio=”16:9″ video_loop=”yes” video_mute=”yes” video_preview_image=”” border_size=”” border_color=”” border_style=”solid” margin_top=”” margin_bottom=”” padding_top=”” padding_right=”” padding_bottom=”” padding_left=””][fusion_builder_row][fusion_builder_column type=”1_1″ layout=”1_1″ spacing=”” center_content=”no” hover_type=”none” link=”” min_height=”” hide_on_mobile=”small-visibility,medium-visibility,large-visibility” class=”” id=”” background_color=”” background_image=”” background_position=”left top” background_repeat=”no-repeat” border_size=”0″ border_color=”” border_style=”solid” border_position=”all” padding=”” dimension_margin=”” animation_type=”” animation_direction=”left” animation_speed=”0.3″ animation_offset=”” last=”no”][fusion_text]
Login
Click on the Dropbox tab and you will see a few choices.
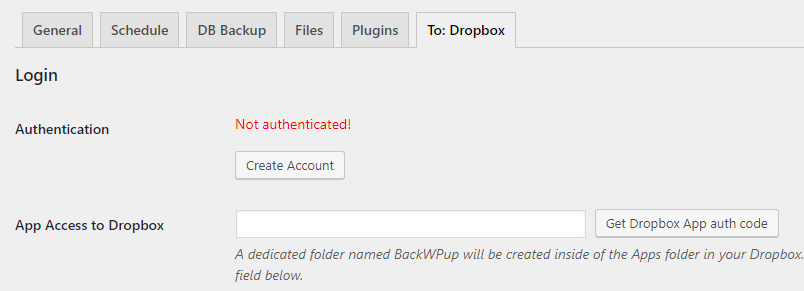
Before you can use Dropbox, BackWPup has to communication with Dropbox. This is done through authentication.
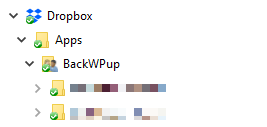
We will be authenticating with App Access to Dropbox. This will help us keep our backups in a separate folder from all of our other Dropbox goodies.
If you are not logged in to Dropbox, do so before clicking on the Get Dropbox App auth code button.
NOTE: You can also grant BackWPup access to your Full Dropbox account.

I don’t like giving Full Access to anything because I am sometimes dumb and accidentally delete or overwrite things. The choice is yours, I only grant App Access.
Another cool thing about App access is how my files are automatically organized for me on my hard drive.
[/fusion_text][/fusion_builder_column][/fusion_builder_row][/fusion_builder_container][fusion_builder_container hundred_percent=”no” equal_height_columns=”no” menu_anchor=”” hide_on_mobile=”small-visibility,medium-visibility,large-visibility” class=”” id=”” background_color=”” background_image=”” background_position=”center center” background_repeat=”no-repeat” fade=”no” background_parallax=”none” enable_mobile=”no” parallax_speed=”0.3″ video_mp4=”” video_webm=”” video_ogv=”” video_url=”” video_aspect_ratio=”16:9″ video_loop=”yes” video_mute=”yes” video_preview_image=”” border_size=”” border_color=”” border_style=”solid” margin_top=”” margin_bottom=”” padding_top=”” padding_right=”” padding_bottom=”” padding_left=””][fusion_builder_row][fusion_builder_column type=”1_1″ layout=”1_1″ spacing=”” center_content=”no” hover_type=”none” link=”” min_height=”” hide_on_mobile=”small-visibility,medium-visibility,large-visibility” class=”” id=”” background_color=”” background_image=”” background_position=”left top” background_repeat=”no-repeat” border_size=”0″ border_color=”” border_style=”solid” border_position=”all” padding=”” dimension_margin=”” animation_type=”” animation_direction=”left” animation_speed=”0.3″ animation_offset=”” last=”no”][fusion_text]
API Access
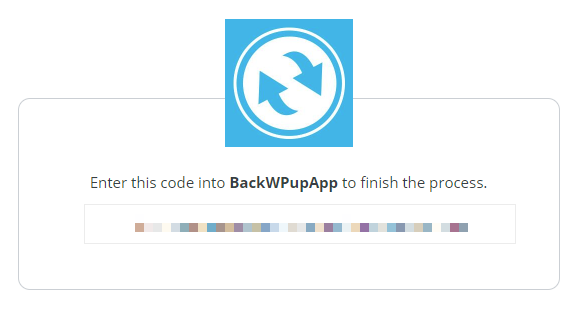
Click on the Get Auth button and you will be taken to the Allow access page which you will click ALLOW.

You will be taken to a page that will give you the code to put into BackWPup. This will always be your App access key so you can copy it down somewhere safe for future use or keep clicking on the Get Auth button (I’ve blurred mine out). Sometimes finding what I saved can take longer. Click once on the string of characters, Ctrl+C and go back to the BackWPup To:Dropbox settings tab.
[/fusion_text][fusion_text]
Backup Settings
Enter in a name you want that will be created and store your backups.
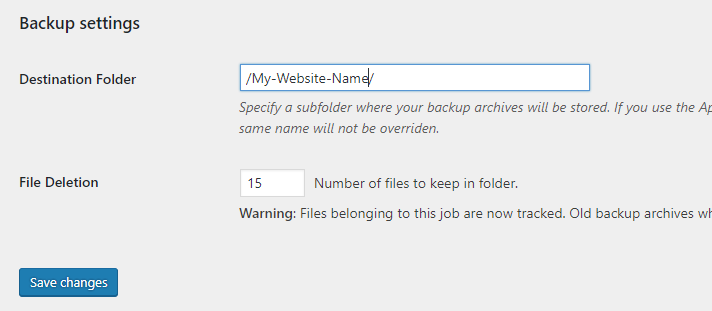
Under File Deletion, tell how many backups to store. This is a helpful automation, you might forget and overload your Dropbox free account. 15-30 should be fine for a small website.
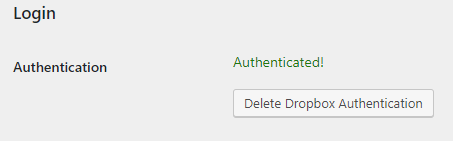
Click on Save Changes and you will get a success from Dropbox’s API. If you do not get a success then you did something wrong. Repeat the steps for Integrating Dropbox again.
You can now run your first backup if you like, we are not going to do that just yet, let’s finish up the Scheduling part first.
[/fusion_text][/fusion_builder_column][/fusion_builder_row][/fusion_builder_container][fusion_builder_container hundred_percent=”no” equal_height_columns=”no” menu_anchor=”” hide_on_mobile=”small-visibility,medium-visibility,large-visibility” class=”” id=”” background_color=”” background_image=”” background_position=”center center” background_repeat=”no-repeat” fade=”no” background_parallax=”none” enable_mobile=”no” parallax_speed=”0.3″ video_mp4=”” video_webm=”” video_ogv=”” video_url=”” video_aspect_ratio=”16:9″ video_loop=”yes” video_mute=”yes” video_preview_image=”” border_size=”” border_color=”” border_style=”solid” margin_top=”” margin_bottom=”” padding_top=”” padding_right=”” padding_bottom=”” padding_left=””][fusion_builder_row][fusion_builder_column type=”1_1″ layout=”1_1″ spacing=”” center_content=”no” hover_type=”none” link=”” min_height=”” hide_on_mobile=”small-visibility,medium-visibility,large-visibility” class=”” id=”” background_color=”” background_image=”” background_position=”left top” background_repeat=”no-repeat” border_size=”0″ border_color=”” border_style=”solid” border_position=”all” padding=”” dimension_margin=”” animation_type=”” animation_direction=”left” animation_speed=”0.3″ animation_offset=”” last=”no”][fusion_text]
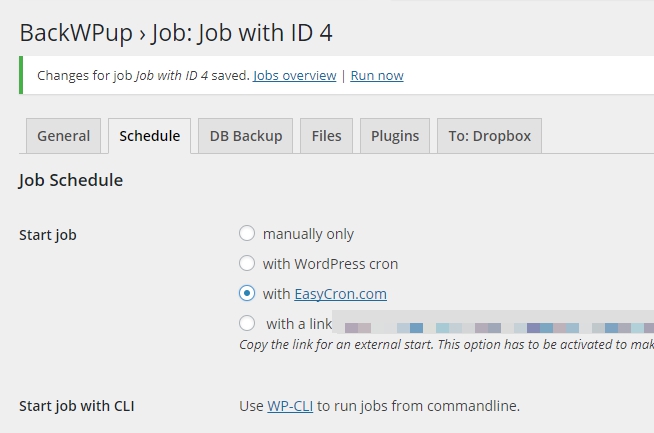
Scheduling
From the screen that you are at, click on the Scheduling tab and you will see a few options.

Job Schedule
You can choose, manually only, with WordPress cron, with EasyCron.com or with a link.
We are going to choose “with EasyCron”. You can always manually run a backup from within the BackWPup menu.
You can also use a link, just copy the link, paste it into your browser and hit enter. The link will send the request and start the process even if you are not logged into WordPress or from another location.
We will use EasyCron and to make that button available we have to click on First Setup API Key.
[/fusion_text][/fusion_builder_column][/fusion_builder_row][/fusion_builder_container][fusion_builder_container hundred_percent=”no” equal_height_columns=”no” menu_anchor=”” hide_on_mobile=”small-visibility,medium-visibility,large-visibility” class=”” id=”” background_color=”” background_image=”” background_position=”center center” background_repeat=”no-repeat” fade=”no” background_parallax=”none” enable_mobile=”no” parallax_speed=”0.3″ video_mp4=”” video_webm=”” video_ogv=”” video_url=”” video_aspect_ratio=”16:9″ video_loop=”yes” video_mute=”yes” video_preview_image=”” border_size=”” border_color=”” border_style=”solid” margin_top=”” margin_bottom=”” padding_top=”” padding_right=”” padding_bottom=”” padding_left=””][fusion_builder_row][fusion_builder_column type=”1_1″ layout=”1_1″ spacing=”” center_content=”no” hover_type=”none” link=”” min_height=”” hide_on_mobile=”small-visibility,medium-visibility,large-visibility” class=”” id=”” background_color=”” background_image=”” background_position=”left top” background_repeat=”no-repeat” border_size=”0″ border_color=”” border_style=”solid” border_position=”all” padding=”” dimension_margin=”” animation_type=”” animation_direction=”left” animation_speed=”0.3″ animation_offset=”” last=”no”][fusion_text]
EasyCron API Key
Clicking on the First Setup API Key link takes you to another Settings area within BackWPup.

First, make sure you are logged into EasyCron, then, click on the EasyCron API key link.
You are then taken to the EasyCron API page, copy the API Token and return to the Settings page.

Paste in the Api key and Save Changes.

You will now need to navigate back to the Backup Job you created or hit the back button until you get back to the Scheduling page (you will also need to hit refresh to see the radio button become activated).
To navigate back, hover over the BackWPup menu on the left, choose Jobs and hover over your Job title and choose edit.
Then click on the Schedule tab.
[/fusion_text][/fusion_builder_column][/fusion_builder_row][/fusion_builder_container][fusion_builder_container hundred_percent=”no” equal_height_columns=”no” menu_anchor=”” hide_on_mobile=”small-visibility,medium-visibility,large-visibility” class=”” id=”” background_color=”” background_image=”” background_position=”center center” background_repeat=”no-repeat” fade=”no” background_parallax=”none” enable_mobile=”no” parallax_speed=”0.3″ video_mp4=”” video_webm=”” video_ogv=”” video_url=”” video_aspect_ratio=”16:9″ video_loop=”yes” video_mute=”yes” video_preview_image=”” border_size=”” border_color=”” border_style=”solid” margin_top=”” margin_bottom=”” padding_top=”” padding_right=”” padding_bottom=”” padding_left=””][fusion_builder_row][fusion_builder_column type=”1_1″ layout=”1_1″ spacing=”” center_content=”no” hover_type=”none” link=”” min_height=”” hide_on_mobile=”small-visibility,medium-visibility,large-visibility” class=”” id=”” background_color=”” background_image=”” background_position=”left top” background_repeat=”no-repeat” border_size=”0″ border_color=”” border_style=”solid” border_position=”all” padding=”” dimension_margin=”” animation_type=”” animation_direction=”left” animation_speed=”0.3″ animation_offset=”” last=”no”][fusion_text]
Break Time
You deserve a break, so here is a Gif to make you laugh (nod to wpbuffs.com’s Joe Howard).

Scheduling
Now that you are back at the Scheduling tab, you will now see that the option button is now available.
Click on the option button.
Scheduling now appears and you can choose the options that best fits your schedule and the space you have available.

Keep in mind that the HOUR drop down menus are in a 24-hour format. So if you want to run a backup at 5pm you will need to add 12 to 5 = 1700, or Hour 17 Minute 00. A minor inconvenience.
Click on the Save Changes button.
Let’s go to EasyCron to make sure that the Scheduling Job was added.
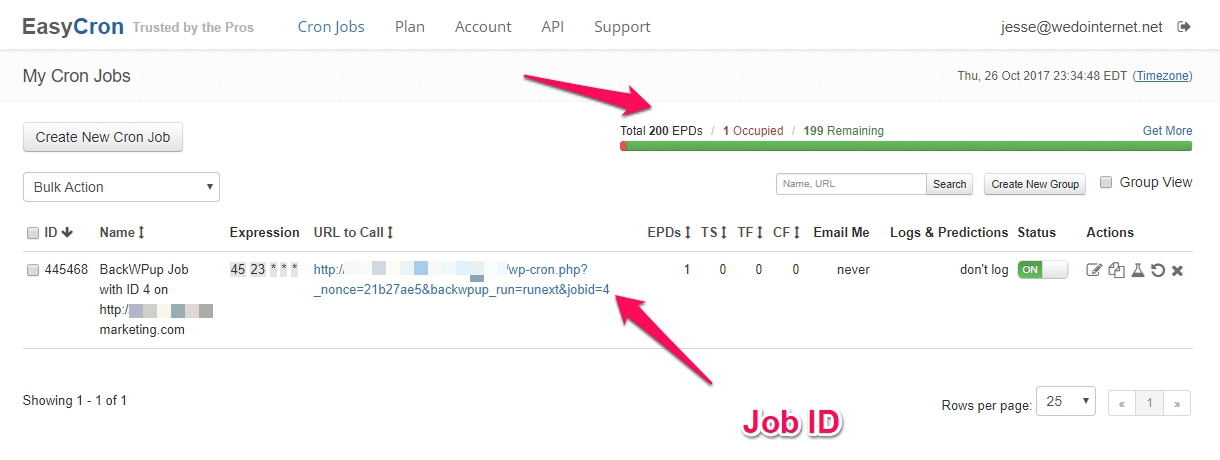 Look for your Job ID. If it’s the correct job then you did everything right.
At the top of this screenshot you will see the arrow pointing to the words, “Total 200 EPDs.” EPD stands for Executions Per Day. If you wanted to make a backup every hour, then you would use 24 EPD’s a day. The Free Plan has a maximum of 200 EPD’s, but the $8 plan has 4,000 EPD’s.
200 sounds like a lot and it is, if you are using it for 3 or 4 websites. If you have 15 websites x 24 EPD’s = 360. Definitely outside of the Free Plan. Don’t worry, you’ve got plenty for now.
[/fusion_text][/fusion_builder_column][/fusion_builder_row][/fusion_builder_container][fusion_builder_container hundred_percent=”no” equal_height_columns=”no” menu_anchor=”” hide_on_mobile=”small-visibility,medium-visibility,large-visibility” class=”” id=”” background_color=”” background_image=”” background_position=”center center” background_repeat=”no-repeat” fade=”no” background_parallax=”none” enable_mobile=”no” parallax_speed=”0.3″ video_mp4=”” video_webm=”” video_ogv=”” video_url=”” video_aspect_ratio=”16:9″ video_loop=”yes” video_mute=”yes” video_preview_image=”” border_size=”” border_color=”” border_style=”solid” margin_top=”” margin_bottom=”” padding_top=”” padding_right=”” padding_bottom=”” padding_left=””][fusion_builder_row][fusion_builder_column type=”1_1″ layout=”1_1″ spacing=”” center_content=”no” hover_type=”none” link=”” min_height=”” hide_on_mobile=”small-visibility,medium-visibility,large-visibility” class=”” id=”” background_color=”” background_image=”” background_position=”left top” background_repeat=”no-repeat” border_size=”0″ border_color=”” border_style=”solid” border_position=”all” padding=”” dimension_margin=”” animation_type=”” animation_direction=”left” animation_speed=”0.3″ animation_offset=”” last=”no”][fusion_text]
Running a Backup Job
Before we test EasyCron to make sure it’s working, we are going to run a Backup Job. We want to confirm that BackWPup is working and that Dropbox is working well.
Find your Job ID (mine is 4) and Click on Run Now.

The Job will start and you will get some feedback bars as the backup runs.

When I ran my backup for the first time, I noticed it was taking longer than I thought it should.
I clicked on the Display working log button and it gave me a live progress report.
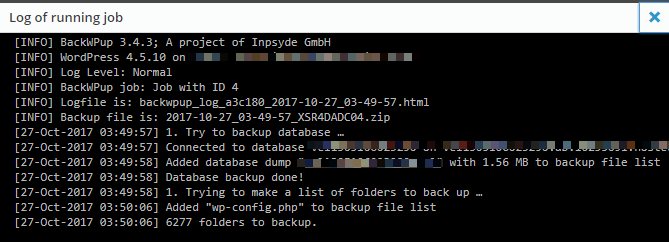
I noticed that 6,277 folders were way more than it should be. This was because BackWPup was running at the root of my web server and included all my other sub-folders for other websites.
I went and edited the job to Exclude those other folders.
I ran the job again and got another error message.

This meant that a request was sent to my server, but the server never responded. After 10 seconds BackWPup gave up. This could be for many reasons, so I didn’t take it too serious and ran the job again and got success.

BackWPup is not without it’s share of technical problems. Thankfully, there is the Display Working Log, and other error messages to help you solve the problem.
If you can’t figure it out, when you get an error message, click on link for information (see image below).
This will give you some info you can send or put up in the forum. I haven’t test the forums or customer support. I haven’t had the need to.
[/fusion_text][/fusion_builder_column][/fusion_builder_row][/fusion_builder_container][fusion_builder_container hundred_percent=”no” equal_height_columns=”no” menu_anchor=”” hide_on_mobile=”small-visibility,medium-visibility,large-visibility” class=”” id=”” background_color=”” background_image=”” background_position=”center center” background_repeat=”no-repeat” fade=”no” background_parallax=”none” enable_mobile=”no” parallax_speed=”0.3″ video_mp4=”” video_webm=”” video_ogv=”” video_url=”” video_aspect_ratio=”16:9″ video_loop=”yes” video_mute=”yes” video_preview_image=”” border_size=”” border_color=”” border_style=”solid” margin_top=”” margin_bottom=”” padding_top=”” padding_right=”” padding_bottom=”” padding_left=””][fusion_builder_row][fusion_builder_column type=”1_1″ layout=”1_1″ spacing=”” center_content=”no” hover_type=”none” link=”” min_height=”” hide_on_mobile=”small-visibility,medium-visibility,large-visibility” class=”” id=”” background_color=”” background_image=”” background_position=”left top” background_repeat=”no-repeat” border_size=”0″ border_color=”” border_style=”solid” border_position=”all” padding=”” dimension_margin=”” animation_type=”” animation_direction=”left” animation_speed=”0.3″ animation_offset=”” last=”no”][fusion_text]
Back to Scheduling through EasyCron.
Let’s edit our job and make some scheduling changes so we can make sure that EasyCron is working before we go to sleep and wake up with no backups.
Click on the Schedule tab and set it to Daily and put it 10 minutes from whatever time you are at right now. For me it’s 00 Hour 15 minutes.
Now, take another break and check back soon. While I wait, I went to EasyCron and noticed that the time had changed. To see if your time is correct, look under the Espressions column.

15 is the minute and 0 is the hour (midnight).
Success
I went to EasyCron at 12:15AM and the job had run successfully.

The job did run on time, but there looks like there were some errors. Unfortunately, the Free Plan does not give you access to an error log.
However, I checked my Dropbox and the zip file was uploaded and after looking inside, I saw that all the files were there. I also did not get an Error Log emailed to me from BackWPup plugin saying my backup failed. Overall I’m satisfied with the backup.
[/fusion_text][/fusion_builder_column][/fusion_builder_row][/fusion_builder_container][fusion_builder_container hundred_percent=”no” equal_height_columns=”no” menu_anchor=”” hide_on_mobile=”small-visibility,medium-visibility,large-visibility” class=”” id=”” background_color=”” background_image=”” background_position=”center center” background_repeat=”no-repeat” fade=”no” background_parallax=”none” enable_mobile=”no” parallax_speed=”0.3″ video_mp4=”” video_webm=”” video_ogv=”” video_url=”” video_aspect_ratio=”16:9″ video_loop=”yes” video_mute=”yes” video_preview_image=”” border_size=”” border_color=”” border_style=”solid” margin_top=”” margin_bottom=”” padding_top=”” padding_right=”” padding_bottom=”” padding_left=””][fusion_builder_row][fusion_builder_column type=”1_1″ layout=”1_1″ spacing=”” center_content=”no” hover_type=”none” link=”” min_height=”” hide_on_mobile=”small-visibility,medium-visibility,large-visibility” class=”” id=”” background_color=”” background_image=”” background_position=”left top” background_repeat=”no-repeat” border_size=”0″ border_color=”” border_style=”solid” border_position=”all” padding=”” dimension_margin=”” animation_type=”” animation_direction=”left” animation_speed=”0.3″ animation_offset=”” last=”no”][fusion_text]
You did it!
You now have a backup schedule and integration with EasyCron and Dropbox. I will admit that this wasn’t the easiest of backup systems, but it works, communicates errors effectively and has a nicely featured free plugin.
Last words
Like everything, your results may vary and you should contact BackWPup, EasyCron or Dropbox, if things don’t work out so well for you. I hope you enjoyed and found this tutorial helpful.
[/fusion_text][/fusion_builder_column][/fusion_builder_row][/fusion_builder_container]